


Why fix a leaky toilet flapper?
Another of the jobs that sat on my Honey-Do-List for quite a while longer than I care to admit has been to fix the leaking toilet flapper in the bathroom在小木屋里——更糟糕的是,我们没有电网,只有相对少量的水可用在我们外部的雨水收集箱里。
Over this long dry summer, our water supply kept on running out, so we became very aware of how precious every single drop of water can be. But I confess, that the beach and yard chores during the hot weather werewaymore appealing than sweating away in the very warm house fixing a leaking toilet. So that toilet flapper left water running needlessly down the drain unless we remembered to turn off the isolation valve between flushes!
There is really no excuse for wasting clean drinking water though, even if you're connected to a seemingly endless supply of city water. I wonder how many of those who rely on the Lake Mead reservoir in Nevada have a leaking toilet flapper?
Lake Mead is one of several man-made reservoirs that store water from the Colorado River to supply drinking water to homes, irrigation for farms and hydropower to Arizona, California, Colorado, Nevada, New Mexico, Utah, Wyoming and parts of Mexico - a total of 40 million people in Western USA - and last summer it nearly ran dry. We can all do our bit to save water, especially as fixing a leaking toilet flapper can be really quick and easy.
A leaking toilet flapper can waste a lot of water
Until I looked it up, I didn't realize that a very typical old and leaking toilet flapper can waste up to 200 gallons of water per day. That could increase your water bill more than $50 per month if your water is metered.Even more astounding, is how much water arunningtoilet can waste and cost.
A running toilet where the flapper has failed completely can waste 4.5 gallons per minute, and that's nearly 300 gallons per hour, or 6,480 gallons per day.That could increase your water bill nearly$60 per day如果你在水表上。突然间,改变马桶上的挡板似乎是一个更好的主意,这些水绝对值得保存!
I decided to do something about fixing our leaky toilet by changing the flapper to save us some of this preciousrainwater in our recovery system tankfor next summer's vacation.
需要什么工具来取代马桶挡板?
At a minimum, to replace a leaking toilet flapper you're going to need some basic plumbers tools on hand, like plumbers grips,a screwdriver set, probably some rags, as well as safety goggles, gloves, ear muffs, and a comprehensive first aid kit and a tetanus shot (you can never be too careful!)
严肃地说,修理漏水的马桶挡板是一种“DIY的简单修理”,如果你在需要的时候没有合适的工具,它会很快变得复杂。所以,如果你没有一个公平的手工具的选择,或者对漏水和手工具不是百分之百的舒服,那么也许可以把更换漏水的马桶阀这样的任务留给专业人士。
Otherwise, use it as a great excuse to go and buy some tools and give DIY home repairs a go - but don't blame me if it all goes pear-shaped, ok? If over 30 years in the construction industry has taught me anything, it's that home reno jobs, especially "quick repair tasks" rarely go 100% as planned. However, in this case at least, I'm pleased to report that toilet flappers are one of the easiest repairs I've succesfully accomplished, and here's how to do it:

Step 1 for fixing a constantly running toilet
Before even opening the toilet cistern, turn off the isolation valveunderneath to save any water escaping unnecessarily or just in case you catch anything in there by accident during the process. Experience tells me this is a really good plan whenever renovating anything to do with plumbing - isolating a water supply 'just in case' is a lot easier than mopping up a mess or repairing water damage!

Step 2 - check that the toilet flapper is the reason why the toilet is running and leaking
To check whether the old toilet flapper is the problem, carefully take the lid off the cistern (this is an older lever-operated flush pictured below) and ascertain that the flapper is the problem.The first thing to check when you remove the lid is the water level, as sometimes if the water check valve is faulty or has grit or debris stuck in it, the cistern overfills and runs down the middle of the water outlet tube.
如果水位看起来确实很高,那么检查注水阀是否工作正常,当水位达到合适的水平并溢出之前,注水阀是否真的关闭了。检查完后,确认水已经关闭,然后继续检查挡板是否状态良好,是否没有任何阻碍链条或杠杆阻止其正确关闭并密封孔。
I reached in and carefully pushed down on ours, and immediately the water stopped running into the bowl. Then when I released it, the running water started right back up. Forensic work completed - time to change the toilet flapper then!

Step 3 - check the size and type of toilet flapper
To replace the old toilet flapper, you're first going to need a new toilet flapper of the right design and size.The way to check is to carefully take the lid off the cistern, which is easier with an older lever operated flush than the new double flush models, and measure the flapper width as well as the total width from the center of the mounting spindles to the exterior edge of the flap.
Looking in the cistern above and below - I removed the float arm to get easier access to the flapper. Also, you can see our way of reducing the amount of water in a flush - we had placed some round beach rocks in the bottom to reduce the total volume of water it holds.
Older toilets (as in the ones more likely to need such repairs) often consume far more water than needed per flush, so taking up space in the reservoir with rocks, or a brick perhaps, can save a lot of water per flush. If you find the toilet is not flushing well with rocks to take up volume, then use a smaller rock to leave more water. Just make sure they don't interfere with the flapper mechanism or the float arm as this will prevent the toilet functioning correctly.
Once you have the correct flapper dimensions it's time for a trip to your local hardware store - which is always my first choice, or you canfind new toilet flappers on line here.

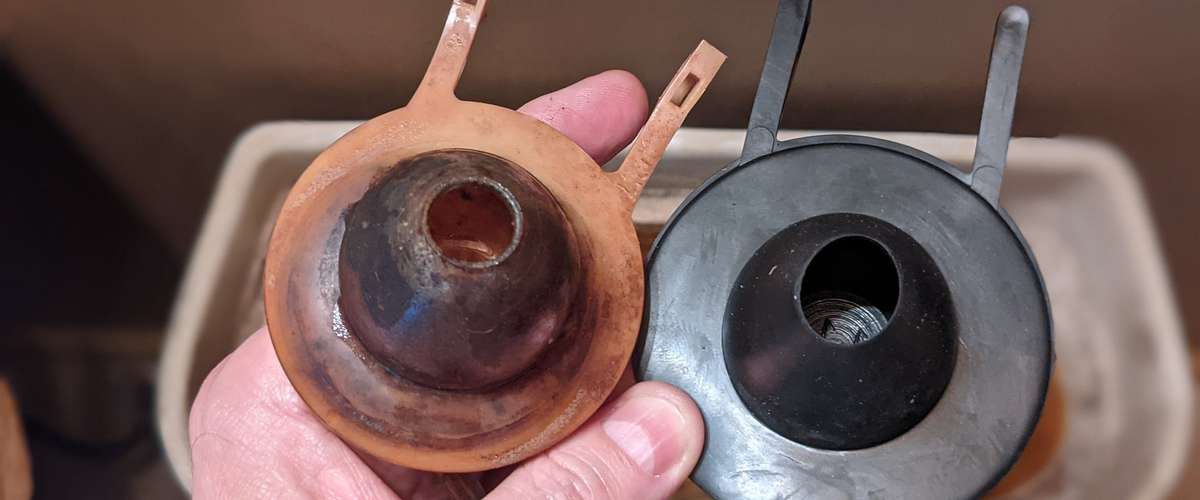
我意识到我们的马桶挡板,除了它非常古老和老化之外,它是弯曲的,所以我可以看到阀座的外缘超过挡板的边缘。这可能是我们的厕所不断运转,随着水位的波动,补水阀也会不停地开关的一个重要原因。
Step 4 - remove the old toilet flapper

Removing the old toilet flapper takes a little dexterity and care, as the arms need to be twisted off the plastic carrier arms.Holding the end of the arm firmly, bend the rubber outwards and twist it around the end of the arm it is clipped on. I was advised that these can sometimes become hard and brittle, in which case run some hot water over them then squirt a little dish soap on to help them release easily.
Most of all, resist the temptation to force anything or to use plumbers grips on it as if you break off one of those skinny little plastic arms it's game over for your toilet valve and that 5 minute DIY repair job I promised just turned into a two hour long DIY nightmare. Worth mentioning, these flappers can be squirmy! It felt like I was wrestling with a small squid, and with the slime and residue in the cistern I wouldn't say it was one of the most pleasant tasks I've tackled.

Once the old flapper is removed from the toilet cistern take a good look at it看看它漏水和自来水的原因是否显而易见——这一次确实如此。
我的怀疑得到了证实,我可以清楚地看到挡板几乎盖住了密封阀座的边缘,并允许水过去。感觉很安心,我还把它和我在当地的合作五金店从超棒的Lilani那里购买的新的挡板密封进行了比较——正如她所说的,新的挡板稍微大一些,允许不同的座位和更好的密封性。(see below)
As per the suggestion in our comments below, I would also suggest smearing /coating the entire surface of the new flapper with plumbers grease as the chlorine in water will slowly harden and deform all flappers, but plumbers grease will repel the water and extend the life of a rubber flapper.

Step 5 - replacing the toilet flapper with a new one
The new toilet flapper was even more flexible than the old one, and as there was still a little dish soap on the holding arms it slipped into place really easily.So easily in fact that I was a little doubtful it was going to even hold!

尽管如此,我还是小心翼翼地把所有的机械装置装好,打开水龙头,让马桶水箱重新装满水。我屏住呼吸——到目前为止,这似乎太容易了……

Much to my relief, the new flapper sealed perfectly, and the toilet was no longer leaking. I fitted the float back into the toilet mechanism by screwing the lever back into the valve.

Step 6 - adjust the water level in the toilet if necessary
I decided that while the cistern was open as I was replacing the flapper valve that I would check the water level,as it is easy to change the amount of water entering the toilet.

这两个调节螺丝很容易转动,上升浮子对进水阀施加压力,使进水阀运行并密封。

The water level in the toilet was set a little high, but it only took a few turns of the screw to get the level adjusted so the stop valve turned off sooner.

Step 7 - test the toilet flushes and seals correctly
So, now that you've finished your DIY fix for a leaking toilet flapper, it's time to turn the water back on, to flush the toilet, and to check for any drips or leaks.I always recommend checking around carefully after carrying out any plumbing work.
As I mentioned earlier, nothing causes more damage in a home than water dripping where it shouldn't be, which can include inside walls in the case ofair leaks with interstitial condensation, or underwindows where cold weather and high humidity causes condensation.
If everything looks good, the toilet flushes as it should, the flapper closes down smoothly andyou've fixed the running toilet, then it's time for a pat on the back.Your leaking toilet is finely fixed!
工具现在应该清洗和干燥,并把所有的东西整齐地放好,为下一次自己动手做家务做好准备。因为一旦你舒服地躺在沙发上,喝着庆祝饮料,如果你像我一样,这件事要到明天才能完成(如果有的话)。除非你能用额外的零用钱贿赂其中一个孩子…
如果你有任何有用的建议,或者对生态之家如何修复漏水的马桶扇有任何意见,请在下面的评论部分发表。在外面要注意安全!
Now you know more abouthow to fix a leaking toilet flapperand why it's important forwater conservation. Findmore pages for DIY reno guidesandsustainable and resilient green building techniqueshere :
Find more about green home constructionin the EcoHomeGreen Building Guide pagesand if you would like moreDIY reno articles like this, thensign up for a free Ecohome Network membership here. |


before i replace a flapper, i will smear/coat the entire surface of the new flapper with plumbers grease. chlorine in water will slowly harden and deform all flappers, but plumbers grease will extend the life of a flapper.
这似乎是一个明智的建议,尤其是当我买了一大管东西,它可能会得到很好的利用-谢谢你,我会把这个添加到文章中。